
Grand Company Guide
 Brought to
you by... FOX




The GC Guide!
This guide is focused on being the easiest, most
comfy way of maxing your GC ranks with the
least amount of effort used as possible
It's laid out to be followed as you reach each
step in the process, from top to bottom.
It is recommended that you select to join the
Twin Adders for your Grand Company
There are 3 classes which you should aim to
choose from, depending on your situation
Archer: The best choice. Also ideal if you're
being carried, or want Peloton
Gladiator: If you're short on time and need to
spam levelling roulette for GC seals (Advanced)
Conjurer: If you're playing solo (Fast queues)
Before you start...
FC Buffs
Seal Sweetner II will affect your Leves, Hunting
Log and even Quest rewards
Activate the Seal Sweetener II FC buff before
doing any GC grinding, it will cut down on the
amount of Leves you will need to do
(Galactic Circus) FC buffs are always available

Equipment
Pick up a complete set of crafted i115 gear for
your class from the marketboard, this will make
leves/hunts extremely fast to clear through
(Galactic Circus) Available in the company chest

Mount Macro

If you're being carried by someone using a multi-seat
mount, be sure to use this macro! It'll allow you to
take a seat without even having to target your friend
/merror off
/ridepillion <2>
/ridepillion <3>
/ridepillion <4>
/ridepillion <5>
/ridepillion <6>
/ridepillion <7>
/ridepillion <8>
/micon Tetragrammaton
Mount
After completing the level 20 MSQ "Lord of the
Inferno", you'll be able to join a Grand Company.
This MSQ is required to unlock housing
The very next MSQ is optional but recommended,
it will reward 300 company seals that you should
spend to unlock your mount right away

Pray return to the Waking Sands...

And come back with your free GC seals
to purchase one "serpent chocobo
issuance" from the Quartermaster

Grab the "My Little Chocobo" quest and
complete it

Use your Chocobo Whistle, and mounts unlocked!

Chocobo Companion
Consider unlocking your chocobo companion, they
can be used to tank, dps, and even fight alone
while you split dps on another enemy
The quest can be started at Camp Tranquil
(South Shroud)

Complete the quest and open your companion
menu to assign its first skill point. Select
"Choco Slash" and acquire it

If you're interested in an optional dps boost for
your chocobo, head to the marketboard and buy
some Sylkis Bud to feed it after summoning
(Galactic Circus) Available in the company chest

Aethernets
Limsa is an excellent city to unlock the entire
aethernet at, you'll be able to take advantage
of these shortcuts at multiple points

Start at the Aetheryte and travel south, down
the stairs and towards the Fishers Guild
Then go northwest up the ramps until you
make your way over to the Arcanist Guild and
take the aethernet back to the main Aetheryte
Travel north up the stairs which will bring you
to the Culinarians guild...

Travel north up towards the Marauders Guild,
then take the aethernet back to the Culinarians
Guild. Travel south to get the final aethernet
GC Hunt Log #1
Start at Camp Drybone (Western Thanalan)

Travel south and hunt 3x Amalj'aa Javelinier
(Solo) Teleport back to Camp Drybone.
Travel east and hunt 3x Amalj'aa Bruiser and
3x Amalj'aa Ranger
Teleport to East Shroud

Travel north and hunt 3x Sylvan Scream
Teleport to New Gridania

Travel northeast into Old Gridania, then pass
through the gate into North Shroud

Travel west and hunt 3x Ixali Deftalon
Make sure to attune to the Aetheryte here!
It will be required for Dzemael Darkhold later
Continue to travel west and make your way up
into Coerthas Central Highlands...

Travel east and hunt 1x Ixali Fearcaller
Teleport to Aleport (Western La Noscea)

Head north through to Upper La Noscea...

Continue to travel north and hunt the
2x Kobold Pickmen on the ground floor
Then make your way up the stairs (or fly...) and
hunt the remaining 1x Kobold Pickman
Pray return to the Waking Sands...
And unlock Halatali for the remaining hunt log
enemies; 5x Heckler Imp, 5x Scythe Mantis and
5x Coliseum Python
You can leave right before the second boss,
since you'll have your hunt log completed

Now that your hunting log is complete, your next
source of GC seals will be from a quest
back at the Twin Adder headquarters in New Gridania

Accept it and then Teleport to Limsa Lominsa

Take the aethernet down to the Fisherman's
Guild and ride the ferry to Aleport...
Travel slightly north to the next Ferry Skipper
and ride the ferry to Candlekeep Quay...

Travel east to the next Ferry Skipper
and ride the ferry to The Wolves' Den...

And turn in your quest for some easy GC seals
You'll now have exhausted all the initial
methods of acquiring GC seals- next up,
The Camp Drybone sesh!
Unlocking the Leve System
The ability to accumulate Leve allowances will
be unlocked upon completing the level 9 MSQ
(Spirithold Broken)


3 allowances will be added (up to a limit of 100)
every 12 hours, you can see your count at the
bottom-right of the quest journal

Even though you can now generate allowances,
you still have to unlock the Levequest system
to be able to use them
Pick up the Leves of Bentbranch quest and head
over to the Levemate NPC at Bentbranch Meadows

Accept and complete the first trial Levequest

Turn in the quest and Leves are unlocked!

The Camp Drybone Sesh
Head on over to Camp Drybone and register the
Aetheryte as your Home Point, which will skip an
annoying menu that pops up on every levequest

Speak to the Flame Sergeant Leve NPC

Kikiri will offer both level 20 and 25 leves, both
of which will be used
There are 4 different "Types" of leves which will
appear at random. If you select a leve and look
at the top-right of the menu, you'll see a "leveplate"
If the leve has any of these three "leveplates",
accept them

If you see a leve with this purple plate, do not
accept it. It's never worth your time. If you
accept it by accident, abandon it.

Pick up as many of the "good" leves as you can
at once. 4 at a time is normal, but you'll have
to settle for just 2 if the purple one appears.

Clear all the leves you have on hand, and then
accept "Return to Levemete?" on the final one
You'll need to collect 7000 GC seals from leves
before you can advance to the next step
Leve Tips

These levequests require the player to use the
/poke emote on certain creatures to find those
holding a special item, then kill these creatures
and use the item on the others to find the
levequest targets
Don't bother with the special items or emotes
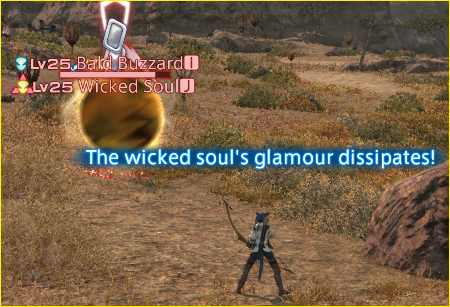
You can just hit the enemy once with any attack,
and if it's the target you're looking for, it will
instantly transform
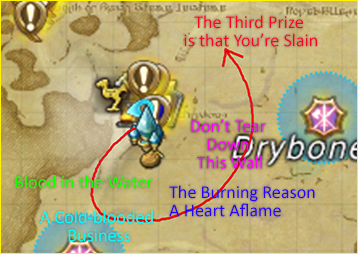
Also consider sticking to this easy loop path,
and using a priority system for leves to
minimize backtracking and wasted time
GC Hunt Log #2
Start at Little Ala Mhigo (Southern Thanalan)

Travel east and hunt 3x Amalj'aa Lancer
(Solo) Travel west and take the safe shortcut path
Travel south and hunt 3x Amalj'aa Sniper
Teleport to East Shroud

Travel north and hunt 3x Sylvan Snarl
Tip: Toggle RP walk when around Morbol enemies,
they are sound aggro and will ignore you
Teleport to Limsa Lominsa

Take the aethernet down to the Fisherman's
Guild and ride the ferry to Costa del Sol...

Travel west and hunt 3x Kobold Missionary
Travel north and make your way into Upper La
Noscea...
(Solo) Take the ferry to cross over to the
western half of the map, then proceed north

Travel north and hunt 3x Kobold Sidesman
Continue north and make your way into Outer
La Noscea...
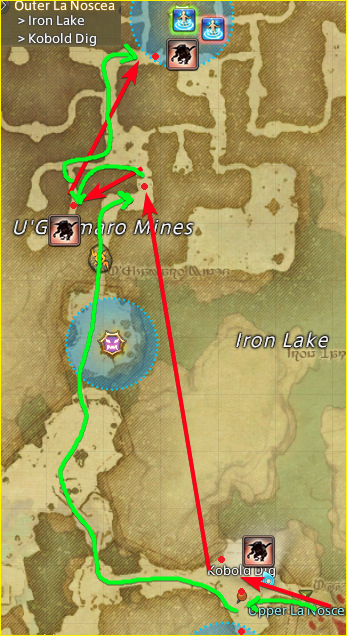
Travel west and hunt 3x Kobold Roundsman
Then proceed north and hunt 3x U'ghamaro
Roundsman inside of the mines
Teleport to Western La Noscea (Aleport)

Travel north and hunt 3x Shelfclaw Sahagin
Pray return to the Waking Sands...
Unlock Qarn for the remaining hunt log enemies;
4x Temple Bee and 1x Temple Guardian
You can leave right after the second boss,
since you'll have your hunt log completed

From this point on, you can get the rest of your
GC seals instantly from Expert Delivery
Go to the marketboard and search for "exarchic"
and buy 10 of anything you can find. Aim to pay
15k gil or less on any pieces you find
(Galactic Circus) Use gil from the FC chest

Take these 10 items back to the Serpent
Personnel Officer back at the GC Headquarters
and you're done with seals!

After this, you'll keep doing promotions until
you'll need to do Dzemael Darkhold
Teleport to North Shroud, travel west and make
your way up into Coerthas Central
Highlands...

Unlock the the dungeon, and then proceed to
travel southwest and enter Mor Dhona...

Attune to the Aetheryte, then clear Dzemael.
Teleport back to New Gridania, accept a GC
promotion, and then you'll be asked to clear
The Aurum Vale
Teleport back to Mor Dhona and travel north
back into Coerthas Central Highlands

Unlock the dungeon, clear it, and you're
finished! Housing unlocked!